Tuesday, March 31, 2015

Authentic Learning About Pets

After reading Chapter 3 of Worksheets Don't Build Dendrites about field trips, I'm on even more of a mission to incorporate as many field trips and other experiences for my students as possible.

We have been learning about animals over the last week or so.  I contacted a local pet store and asked one of the employees to bring in an assortment of pets, but no "typical" pets like cats and dogs.  I wanted to students to experience pets that they might otherwise not see.  I did this with my class last year, and it was a big hit.  This year, they were kind enough to include all the kindergarten classes.

Two young men presented 20 minute sessions to 2 classes at a time.  We learned about how to care for each of the animals, the life span and other cool facts.  Students were then given the opportunity to touch each animal; this was, of course, the highlight for them!
Bunny

This was a "no thank you" for me!  The kids loved the colors of this snake.

Fainting beetle

A baby lizard (bearded dragon maybe?)

Baby tortoise
After seeing and touching all the animals, we were able to see a larger (6 yrs. old) tortoise and the bunny snack on some lettuce.


I'm hoping to be back soon back on track with the Worksheets Don't Build Dendrites book study!

Saturday, March 28, 2015

Weekend in Review

I'm joining Brenda at Primarily Inspired to fill you in on my weekend at the Spring Teacher Blogger Meet Up!  I had the opportunity to join over 100 teachers in French Lick, IN for a weekend of fun and inspiration. #springteacherbloggermeetup2015


These letters were created as a "getting to know you" activity.
I was blessed to travel with these two wonderful women: Em from Curious Firsties and Jennifer from Songs and Stories in Second.  We met at Em's house Saturday morning and made the 3 hour journey to French Lick together.  Our drive was filled with stories, apps to share and book suggestions among other things.  There was some "non-teacher" talk too!


We got to spend the afternoon on Saturday with an amazing group of teachers.  It was great to listen to everyone share their stories, tips and tricks.

I loved the simple table centerpieces from Schoolgirl Style!
This girl typically has terrible luck in giveaways.  Terrible luck as in 10 prizes for 10 people and guess who is number 10.  Well, I'm thrilled to report that not only did I win something, but I won a free 1 or 2 day workshop from SDE!  Woohoo!


We can't forget about all the amazing teacher swag too!  Big thanks to Erin Condren, Scentos, Creative Teaching Press, Lakeshore Learning, and Vera Bradley for all the goodies!  You have the opportunity to win all these goodies too.  Be sure to enter at the bottom of this post!


After our afternoon of fun and learning, we set off for dinner and a little exploration of the hotel.  We also ventured over to West Baden to see the dome.  


After a little time to explore, we headed back to the room to get ready for the PJ Party.  Go Noodle and TpT  helped sponsor a great evening of fun!  We had the opportunity to decorate keepsake pillowcases, snack, chat and Go Noodle.

Such creative decorating!  That is a table.

Many of the OH bloggers from the PJ party at the photo booth.
It was a wonderful weekend of meeting new people and learning from one another.  It is so nice to talk to others who "speak the same language" and want to learn too!  It was totally worth the 5 hour drive to Em's house; thanks again for driving to my friend!

Make sure you enter the giveaway and check out the blogs below to see more about our weekend together!


Tuesday, March 24, 2015

Smarty Spell App Review

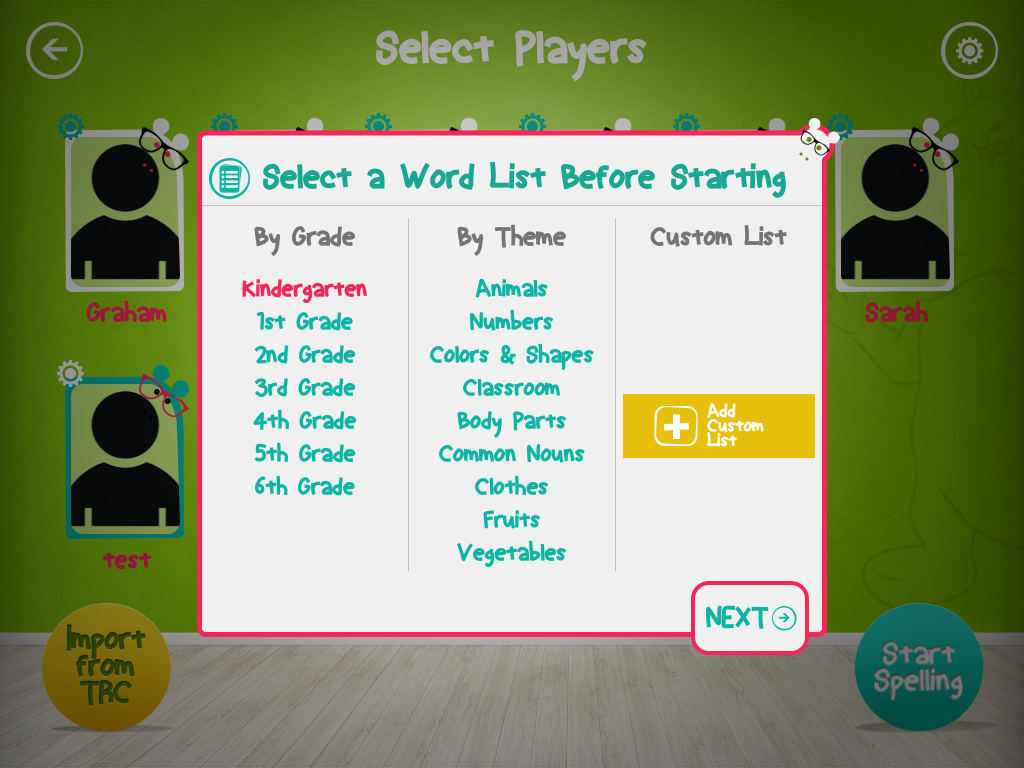
I have a couple Smarty Ears apps, and by following them on Facebook, I saw they were looking for bloggers to review their new app, Smarty Spell.  I was excited for the opportunity to check it out! Smarty Spell is listed in the App Store for $3.99.


I downloaded it the same night I received the notification it was available.  I wanted to check it out before introducing it to my kiddos.  I'm glad I looked at it ahead of time.  I love that each student can have their own account.  I entered each student's name prior to introducing the app to them.  You can also add a picture or an avatar, but I was more concerned with getting the app in their hands, so these are currently blank.


The navigation of the app is very user friendly.  Students are able to navigate on their own with little difficulty.  The app includes word lists for grades K-6, so differentiation is made easy by just reminding students what level I want them to work on.  By choosing a grade level, you get a preloaded list for that level.  There are also theme lists.  I think it would be great to have lists by phonics skill as well. This seems to be the way many spelling lists are set up, so I think this would be an advantage for the app.  We do not give weekly spelling tests in K where I teach, but we do word work, this feature would be great to tie into that!  You are able to set up your own list, but it would be great to have these already included.


I like the ability to see a report of each student's learning/progress.  This is a great feature when students are working independently; they know there will be some accountability when I reference that I saw how they did.

My kiddos' complaint is that the "praise" after getting it right always says the same thing.  In many of the other apps they use, "praise" is typically varied (great job, awesome, way to go, etc) so I think they almost expect that.  When a student misses a letter, the app fills in the letter and waits for child to attempt the next letter.

Overall, I think this is a good app for students to practice spelling.  My favorite features are the individualization aspect (differentiation) and the ability to see each student's individual progress.


*I was not paid for this review, however, I was given the app for free to provide a review.*

Monday, March 23, 2015

Create-An-Insect

This post has been in the back of my mind for a while, but life got in the way and it is just getting written now.  We studied insects about 3 weeks ago with our study of spring.  It seemed really early to me to be doing insects with snow on the ground, but that is how our curriculum is set up, so off we went!

After learning about the characteristics of insects through our morning message and a little book provided by our curriculum, we set to work creating our own insects.  My only requirements for their insect creations were: it had to have the characteristics of an insect (3 body parts and 6 legs) and it could not have the name of an insect we already know about (no bees, ants, grasshoppers, etc).  Making up a name for the insect proved to be one of the most challenging aspects!

My kiddos had access to white Model Magic (L-O-V-E that stuff!), pipe cleaners, paint and Sharpies.  I would have given them other materials if they would have asked, but they seemed content with these items.  This is the first time I've used the white Model Magic and painted it. I would absolutely do this again.  It was much easier to add details with paint than it was to try to combine different colors of Model Magic as I tried in the past.

We started with the Model Magic to make the insect's body.  Each body part is held together with the next part with 1/2 a toothpick just to be safe.  They then collected pipe cleaners to make their legs and antennae.


The following day, my kiddos began the painting process.  They love paint, so this was probably the best part for them.  I asked each kiddo individually what color paint they wanted then split them into table groups by paint color.  This cut down on paint waste (I can't ever judge how much I need to put out!).  I would definitely split them this way again.


Once the painting was done, we let our insect creations dry overnight.  The next day, kiddos added details such as eyes, mouths, etc.  They also gave their insect food and/or a habitat.  Then we were ready to display them.


I took them to the computer lab to write a description of their insect.  I told them that someone was looking for their insect. What would they look for? What colors is the insect?  What special features does it have?  Where does it live?  What does it eat?

After my kiddos typed and printed their descriptions, I shrunk them to 50% on the copier to put them on the table by their insects.

"This is the bitter bug.  He bites a lot.  My bug eats people and lives in a cave."

"It eats leaves.  It lives in the rainforest.  It is black.  It has 6 legs.  Its legs are black and orange."

"My princess fly opens its eyes when it is outside.  It lights up.  The color is black.  It eats flies."

I allowed my kiddos to use their own spelling on this project because I think it is important to encourage them to be writers and not to always correct their spelling.  They know that the "red line" on the computer means that it is spelled incorrectly.  I'm proud of their inventive spelling is pretty good for 3rd nine weeks of kindergarten!

Our insects are still on display in the hallway right outside our room and have received many compliments from staff and students.  This is a project that I would most definitely try again.  

Sunday, March 22, 2015

Teacher Tool Gift Exchange

Last week I had the privilege of heading to French Lick, Indiana for the Spring Teacher Blogger Meet-Up.   There will be more posted about my trip next week, but for today, I would like to tell you about the Teacher Tool Gift Exchange.  Christina from Sugar and Spice is hosting a linky so you can see all the amazing new "teacher tools" we shared!


I forgot to take a picture of mine before I gave it away, but I gave away 5 plastic mailboxes from the Target Dollar Spot and a pack of Flair pens.  I love the plastic mailboxes for a variety of sorting activities.  It gives sorting some novelty and can be incorporated in your community helpers and Valentine's Day units.

To exchange gifts, we were first split into groups by grade level, then we played a "left-right" game.  Amanda Pauley read a story and every time you heard the words "left" or "right", you passed the gift in your hand in the said direction.  When the story was over, we took turns opening the gift we were holding.  The "giver" then explained the gift to the group.

Here is our kindergarten group after the exchange.
I was the lucky recipient of a very cool gift from Deanna Jump.  It was quite heavy and wrapped very well- I had a hard time getting in. When I first opened it, I was unsure of what I had just opened.  Deanna explained that it was to hold my Scentos markers.  It makes an adorable display!  She also explained that Katie Mense's husband makes and customizes them.  Mine says "Share A Smile."


As you can see, I need some more new Scentos because the "skinny" ones do not fill the hole (though it does seem to keep them upright).  My kiddos love this little organizer!  I think they are almost as thrilled just to look at and organize the Scentos as they are to use them!  Thanks, Deanna, for a fun new "tool" to add to my classroom; you've helped make our art center a little more organized!

Make sure you check out all the other "teacher tools" that others received!


Thursday, March 19, 2015

Eating Our Way Through 2-D Shapes

At I Teach K! this past summer, I had the opportunity to attend two of Mary Amoson's (Sharing Kindergarten) sessions.  She talked a lot about student engagement and how to make learning fun.  I couldn't wait to get to geometry after her session and one specifically on geometry from Catherine Kuhns.

One of Mary's activities was to use Pull & Peel licorice to have students make shapes.  I found some spring-colored individually wrapped Pull & Peel at Walmart.  If you follow me on IG, you probably saw a picture of this activity.

My kiddos seemed to have a pretty good grasp on basic shapes, so we are focusing more on the vocabulary, composing shapes and describing these shapes.  I created a little recording sheet for them that included: a solid line shape to build the Pull & Peel on, a dotted shape to trace with a pencil and a box to list how many sides and how many vertices.   My kiddos' favorite word is "vertices" lately.  It makes me giggle when they use this correctly without prompting.


She was into making sure that everything was very precise.


This kiddo was quite proud of her idea to number the sides as she built the shapes.


My kiddos loved this activity!  They were engaged the whole time and always seem to be willing to work for a little snack in the end.  The circle seemed to be the most difficult one for them to make because the Pull & Peel was not quite long enough to go all the way around.  It did not like to stay curved as they tried to piece it together.  They loved making the strips smaller and piecing together as needed to make all the shapes.

How do you make geometry fun in your classroom?

Wednesday, March 18, 2015

Worksheets Don't Build Dendrites: Chapter 6 {Humor}

I'm linking up with Amanda over at One Extra Degree; she is hosting the linky on Chapter 6 about humor.


When I began to think about humor in my classroom, I couldn't pinpoint any one specific thing I intentionally do to elicit or engage students with humor.  I was feeling a bit sad that I didn't really have anything I was doing well in this chapter.

As I started to read the chapter, I found that there are some suggestions that I already incorporate.  It was focusing more on positive atmosphere and engaging those positive feelings in the classroom. One of the suggestions I already use is games.  My students love a good game!  I am thankful this year that I don't have a class of kiddos that stresses about winning or losing and just plays "for the love of the game".

I'm a little disappointed that I didn't get a picture of this, but we played the game "Make Ten" that I read about over at Joyful Learning in KC during Chapter 4 of the book study about games.  Each day we journal about our day, and numerous kiddos wrote about this game and how much fun it was.

My kiddos this year love "little things" that make the day different.  Things like a special project or activity frequently get "This is the best day ever" from this class.

One thing I'd like to incorporate from this chapter is adding some "intentional humor".  I found some kid-friendly jokes on Pinterest.   Our building uses a clip chart behavior system.  My plan is to have each child above green choose a joke to read to the class at the end of the day.  These will be put in a container and chosen at random.  It is a great way to get a little reading practice in and add some humor.

Our next unit, beginning next week, will be about animals.  I plan to have students write some animal jokes on April 1 to celebrate April Fools Day.

How does humor find its way into your classroom?

Monday, March 16, 2015

Birds Need to Eat Too

The calendar says spring is coming soon, but here in Ohio, the evidence has been mixed.  At my house, there is still some snow on the ground.  Today it was in the 60s, tomorrow back to the 40s.  As part of finishing up our unit on spring last week, we made some bird feeders to share with the birds as they return to the area.

The recipe is very easy and does not involve peanut butter for those with allergies in their classroom.  All you need is bird seed, flour, water and a little corn syrup.  I have a local college student who visits for an hour 2 days a week as part of a class requirement.  This project was his job during centers last week.  Kiddos wrote their names on a paper plate, then we put a piece of wax paper over the plate.  The cookie cutter was then placed on the wax paper to keep the bird feeder from sticking to the plate.  You could probably forego the plate, but it did make them much easier to transport!

He pulled kiddos over 4 at a time, mixed up a batch with them and helped them make their feeders.  Once it is mixed, kiddos took handfuls and pressed it down to pack it into cookie cutters.  This was met with excitement, "ewww gross", and shrieks of laughter. A preschool teacher down the hall was very generous to share her playdough cookie cutters for this project.


We used a straw to poke a hole in the feeders while they were still in the cookie cutter.  After poking the hole, we removed the cookie cutter and took the feeders to the hallway to dry.  I flipped them at lunch time, before I went home and again the next morning.  They dried much like salt dough would.  A string was put thru the hole and kiddos took them home in a ziploc bag to hang in a tree or on a bush.  One kiddo also suggested hanging it on a hook if you don't have a tree.  They are always thinking!


You can see the pieces on this one that did not get packed into the cookie cutter.
We just threw these little pieces away.

I think I will make these during my winter unit next year to help those birds out who stick around with us in the winter.  I didn't know about this recipe until a couple weeks ago or I probably would have done it sooner this year too.  One batch made about 8 feeders, but it would depend on the size of the cookie cutter.  We found that it was easiest to use cookie cutters that were mid-sized and did not have small parts (arms, legs, stems, etc); it was very difficult to keep these small parts intact when removing the cookie cutter.  The bag of bird seed was plenty and was shared with 3 other classes!

Do you have a favorite project or recipe that you do with your class?  I'd love to hear about it!

Sunday, March 15, 2015

Worksheets Don't Grow Dendrites Chapter 5 {Graphic Organizers}

Michelle from Fabulous in First is hosting today's chapter about Graphic Organizers.


I know graphic organizers are important because they help students visually organize information, and the Ms. Tate reinforced this concept citing that both left and right-brained students can benefit from graphic organizers.  As a third grade teacher, I used and encouraged students to use organizers quite a bit, but for some reason in kindergarten I don't seem to use them as much.

I've used Venn Diagrams occasionally when comparing stories and have used webs when doing research with students.  When I read that all students can benefit from the use of graphic organizers, I knew it was important to make more of an effort to incorporate them in our classroom.

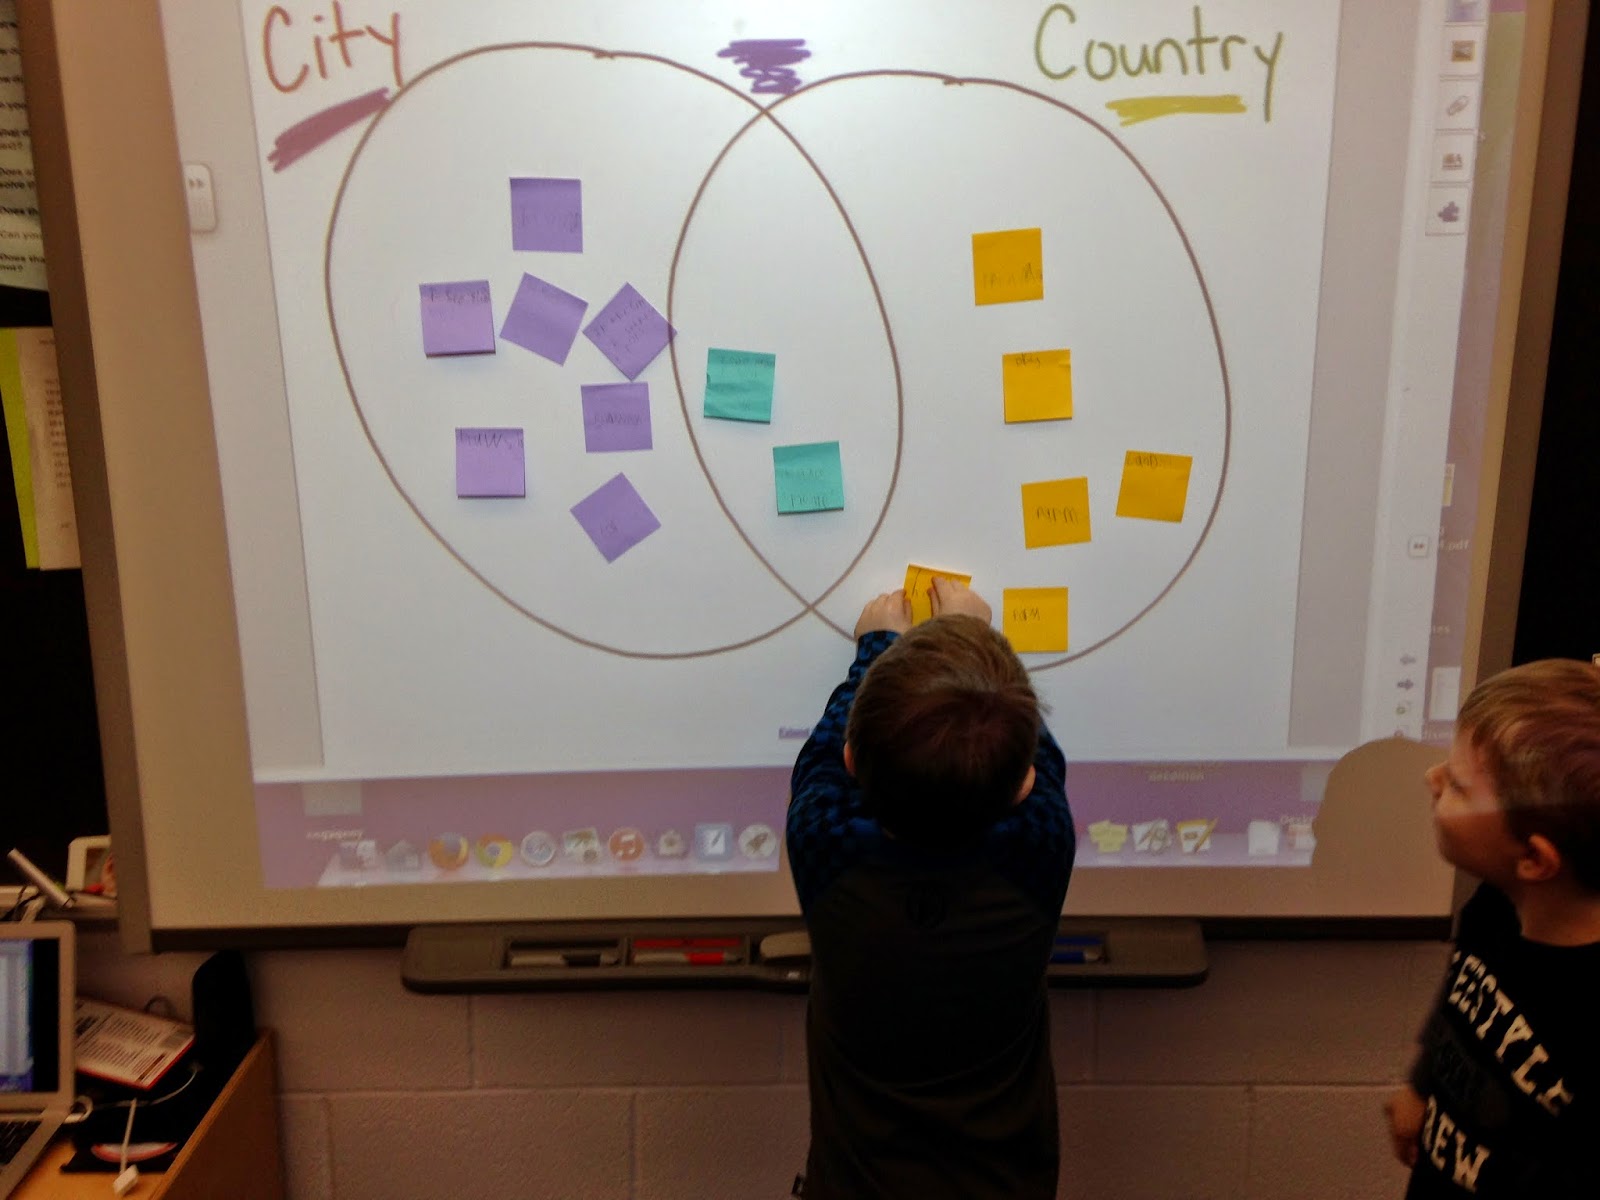
This week we began a study of city vs. country.  I decided this was the perfect time to give a Venn Diagram a try.

Students started off by writing things they could find in the city/country/both on Post-Its.  Each section of the Venn Diagram had a specific color of Post-It.  I did this so we could see how well we sorted (a little self-assessment). Meanwhile, I drew a Venn Diagram on the SMARTboard.  My kiddos were seated in groups of 4-5 and were encouraged to chat before writing on/posting Post-Its.


Students brought their Post-Its up as they wrote characteristics of each place.


After about 5 minutes of posting Post-Its, we came back together as a group.  We looked at each Post-It and grouped the ones that were the same.  We then discussed whether or not that is where the Post-Its actually belong.  Once we had all the Post-Its where they belonged, we could easily see how well we did sorting the characteristics.

My kiddos loved this activity, and it was an easy way for them to sort the information.  I'm looking forward to using more graphic organizers in my classroom in the future!

Thursday, March 12, 2015

Bunny Directed Drawing

I wanted to write about this one sooner rather than later so you could make these too!

We've been doing quite a bit of directed drawing in my room this year.  I guess "quite a bit" is a relative term.  Since I did zero last year, doing it more than once seems to be "quite a bit"!

I found this guy thanks to Pinterest (where else would I look after all!).  I love her directions because they are so easy for a less than artistic person such as myself to follow.  We did the reindeer from this site in December and they were awesome.


In our last couple professional development meetings, we've been talking about getting the kids to really listen to what you are saying/what is happening around them and how this ties to their language and phonological awareness development.  When we start a directed drawing, I always ask the kids why we are doing it, and they know it is so they can listen and follow directions.  One little guy said "because if we don't listen to what you say, it won't look like a rabbit!"

After the directed drawing portion, we had a discussion on what color a rabbit might be in the wild or as a pet.  My kiddos chose their colors and used crayons to color on this one.  We painted the background with watered-down liquid watercolor.  Choices of pink, blue and green were given.


I love the finished look the mats give these.  Each bunny is unique, but all the kiddos must have been listening because we have a class set of bunny art.  They are hanging in the hallway outside our room.  We've received many compliments already!


Tuesday, March 10, 2015

Book Study: Worksheets Don't Grow Dendrites Chapter 4 {Games}

I'm linking up with Katie from Queen of the First Grade Jungle to share my take on Chapter 4, which was all about using games in the classroom.  My students love playing games in the classroom.

We love quick skill practice games like "Zap" or "Bang".  These can be used with cards or popsicle sticks and are generally quick to prep and easy to store.

Around Thanksgiving we had "Family Game Night" in my classroom.  Families were not invited, but I called it Family Game Night as we are a classroom family.  Students learned to play Trouble, Connect 4 and Candy Land.  I modified the Candy Land cards using ideas from Mel-D- Seusstastic.  She has a wide variety of different Candy Land cards available.   We've done everything from sight words to addition and subtraction facts.

My students also love the strategy game shared by Miss DeCarbo.  I have since recreated similar games using different seasonal clip art and themed counters.  I like these because they make kids think and they are quick, but students want to play them again and again.

I created a St. Patrick's Day version for you!  You can download it here.


One of the suggestions in this chapter was to allow students to create their own game.  The last couple weeks we've been playing I Have, Who Has in class.  I have a set of phonemic awareness I Have, Who Has games focusing on rhyming, matching initial sounds, and matching ending sounds.  I decided to take on this little adventure of allowing students to create a game using this format.  It was a bit of a learning curve for me to get the words in the correct place, but they were SO excited to get to make their own game!   Once the game is complete, a student was absent from this group and he needs to finish his set of cards, it will be added to our reading center for our class to enjoy.

The rhyming words are on the back of each sheet.  These will be laminated and cut into cards.

As the title of the book states, this chapter really reinforced for me that worksheets have a place in my classroom, but they shouldn't be the way all learning occurs.  Students love games, and when actively engaged in them, are learning more than just the academic concept you've included in the game.  My goal is to incorporate more games, and more specifically, more student-created games, in my classroom, especially during reading center time.

How do you incorporate games in your classroom?  What are some of your students' favorite games?

Monday, March 9, 2015

2-D Shape Castles

Last week I wrote about "academic art" in response to reading a chapter in the book Worksheets Don't Build Dendrites.  You can read that post here.

When searching for ideas that were a little more than your basic 2-D shape work, I came across a pin by an art teacher for making shape castles.  I cut many 3x3 from brightly colored construction paper then cut these in half to create triangles.  The triangles were put at the art center with black construction paper.  Students were given the direction to create a castle using the triangles.  I told them that they can use triangles to form squares and that they should try putting them together in different ways to see what they could make.

Here are a few examples of student work:


When we move into 3-D shapes, I plan to have students make castles using 3-D shapes as well so they can see the differences between 2-D and 3-D shapes.  I'm hoping that them seeing 2 things that they made side-by-side it will help them see what makes something 2-D and what makes something 3-D.  We'll be back with that project in a few weeks!

What do you do to engage your students in 2-D shapes learning?