Saturday, August 29, 2015

Primary Colors Art

We started school this past week, and I wanted to start with color words because most children come knowing their colors, but are excited to be able to learn to read words quickly.  We focus on color words because they were engaging for the kids.  Thanks to HeidiSongs, we learn how to spell them pretty quickly.

Our first week is all about starting to establish routines as well.  Our building does a staggered start (A-M day one, N-Z day 2) then we have an aide for 2 days when all the kiddos are together.  I took advantage of a 2nd set of hands and decided to do some painting.  I'm not big on getting out paint early in the year; I like to wait until the kids are used to my expectations for other things in our classroom, but it is hard to pass up when you have help!

We had talked about the primary colors and color mixing the day before this activity.  Each child received an 8x10 canvas taped off into 6 sections.  They were given red, yellow and blue watercolors.  I showed them how to mix colors on the canvas and give them the freedom to create as they'd like.  There were no requirements to make certain colors or paint a certain way.  My kiddos painted in groups of 4 with my aide, who is our fabulous librarian- she was a great sport!


Here are some examples of finished projects hanging in the hallway (the tape is peeled off):


This project was a fun way to start our year.  My kiddos got to show their creativity while sticking to our color topic.  They were SO excited when I said we were going to paint, that it made the mess (my table has a permanent yellow blob despite the tablecloth that was covering it) totally worth it.

Have you tried anything 'crazy' in the first week of school?

Thursday, August 27, 2015

Chair Bags

I posted a picture of my classroom on Instagram last week, and I had a question about the bags on my back of my kiddos' chairs.  You can see pictures of my classroom on the post I wrote yesterday about my classroom setup.

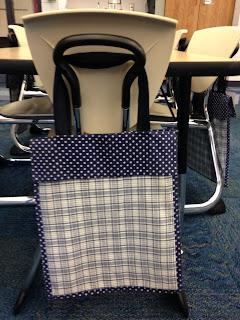
Our chairs are about 12 years old.  Our building was completely remodeled (new furniture, paint, flooring, etc) my first year of teaching.  When I see pictures of other classrooms, I'm not sure I have seen many chairs like ours. They have a little handle on the back, and the backs aren't very wide, making them not real conducive to your typical "seat sack".

My first 2 years of teaching I taught third grade language arts.  I had 2 sections of kids, so my homeroom kids used the desk and my afternoon class used these bags as their "desk".  When I moved to K, I took the bags with me for my kiddos to store things.


Here is a picture of the bag on a chair.  The bags are about 15" long.  They are made from a thick fabric.  Mine have the polka dot fabric on the inside with a lining between the 2 layers of fabric.  A retired aide from our building made these (I spent all of my "fees" money on these my first year...we don't get that money anymore).  Another kindergarten teacher had her mom make them using duck canvas.  The handle is about 20" but doesn't hang that far down; that is just how long the piece of fabric is.  It is sewn into the bag a little bit as well.

Below is a photo of the inside of the bag.  This year my kiddos keep their home/school folder in their bags and their bag of independent reading books in there daily.  In the past I've included school boxes as well, but we're using community supplies this year.  I use binder clips (2) to clip their name tags to the bags.


These have held up very well over the years!  The only repairs have been because of human error.  My kiddos have to be reminded to hang up both handles so the materials in their bag don't pull on the bag (had to have some seams reinforced).  I wash them at the end of the school year in preparation for the next year, though they are easy to throw in the washer if needed throughout the year.

If you have any other questions about these or other things you've seen in my room, please leave a comment!

Wednesday, August 26, 2015

Classroom Set Up 2015

I want to share a few pictures of my classroom this year.  It is very similar to my set up from last year with the exception of where the computers are and my teacher table.  I also created more space in front of my chalkboard to make my word wall accessible to my kiddos.


This is the view from the doorway.  To the left (where you can't see) are my cubbies.  My teacher table (which doubles as my desk) is on the far wall to the right of the window you can see.  To the right of this picture is my library, writing center and word wall (see below).


This is the wall immediately to the right of the picture above.  The blue drawers are going to store math manipulatives.  Each table will have a set of drawers to try to cut down on the time it takes to distribute materials.  We are using Eureka Math (Engage NY) for the first time this year, and I understand there are a lot of manipulatives needed each day.  This is my attempt at solving that problem. You can also see my new word wall. The colored dots have upper/lowercase letters on the and the white circles are the picture cues that are from our curriculum.

This bookcase is serving as my "message center" and art materials storage this year.  My grandpa made it in shop class in middle or high school and it is easily 75+ years old. My brother tried to pitch it when he moved in July and I rescued it.  My kiddos drop their folders off for me to check in the morning in the basket, notes collected go on the top for me.  Tissues and markers are on the bottom shelf.  Additional art materials for students to access will be added in the future as they are introduced.  Glue bottles are in the two baskets on the floor.


This is my library update.  I added the additional shelf (small guy to the left) to give my kiddos more storage so it wasn't so crowded.  I think I am going to add framed pictures of readers to the top of the bookcase.  We'll see, but I know I want something with photographs. The blank chalkboard will be used to display student work.

I had a question about the bags on the back of my students' chairs.  I'll be back to write more about those soon.  Thanks for taking a peek at my room.  I'm happy with my space this year after a couple of days with the kiddos in the space!

Sunday, August 23, 2015

Sunday Letters {August 23}

I'm linking up with Michelle from Big Time Literacy to share some Sunday Letters.  My first day with kids is tomorrow, so much of mywriting today relates to that.  I'll be back to share more about my classroom set up this week.


Papers are from Zip-A-Dee-Doo-Dah Designs and the font is Ray of Sunshine from KG fonts.


Sunday, August 16, 2015

Feelings

Feelings can be such a hard thing for kindergarten kiddos.  They have very strong feelings and opinions about things, but don't always know how to appropriately express them!  Our second unit of the year (so in week 3) we start to focus on feelings for a couple weeks.  My kiddos really loved my fill-in-the-blank informational books last year, so I decided to start off this year with a feelings book.


Students will fill in the feeling word on each page based on the picture on the page. The feeling word is labeled for easier copying.  I think it is valuable for them to write the word themselves, which is why I created these as fill-in-the-blanks.  They will also draw in the facial features on a blank face to show that feeling.


A second version of each page is available where children have the opportunity to write a time they felt that particular feeling.  


Be sure to stop by Diane's blog: Spreading Joy...One Giggle At A Time and enter her giveaway for some back to school social stories to help your students establish rules and manners. Sometimes feelings can get in the way with these things too!

We start back tomorrow, but because we do conferences with each family prior to school starting, our kiddos don't start until next week.  I will have the opportunity to meet them beginning this Wednesday though.

How do you help your students learn more about expressing their feelings and understanding the feelings of others?

Monday, August 10, 2015

Monday Made It {August 10}

I really thought I was going to be better about Monday Made It than I was this summer. The creative juices didn't seem to come until the end of summer, which is a bummer.  At any rate, here I am today linking up with Tara from 4th Grade Frolics.


Our district adopted Eureka Math (Engage NY) this year.  We piloted Go Math last year, but obviously that didn't make the cut.  We were impressed with Eureka Math when we tried out a few lessons at the end of the year, but the prep work is no joke!  I've been working with one of my teammates off and on throughout the summer to get the templates copied and ready to go.  One of the things we needed were rekenreks.  We decided to whip up a set and have them ready to go.

Materials needed were: black pipe cleaners, popsicle sticks, red beads, white beads and hot glue gun. 

We started by cutting the pipe cleaners in half.  Then we strung 5 white beads and 5 red beads on each pipe cleaner piece.  The next step was to wrap the ends of the pipe cleaners around the popsicle sticks.  We put 2 pipe cleaner pieces on each stick- this made 20 beads per rekenrek.  The beads didn't have a ton of room to move, but you could see the division between the 2 sets of beads, so we went with it.


In the picture above, you will see a pipe cleaner stick attached to 1 popsicle stick.  Another popsicle stick was attached to the other side by twisting the pipe cleaner around it.

The last step we did was to glue a popsicle stick over the top on one side to make them a little more stable.  It took 3 of us about 2 hours to create 65 of these.  We were working on a few other things in the meantime too (printing things and retrieving them mainly).  We are looking forward to using these in math this year!


I've made lots of baked goods too, but no photos.  Hopefully I'll be back next week with my classroom completed and ready to go.  We start next Monday (no kids yet though).